Choosing the Right Flagstone
Selecting the right flagstone is the cornerstone of creating a stunning and durable walkway or patio. With an array of options available, understanding the differences in color, texture, size, and thickness is crucial to achieving a harmonious and lasting result. This section delves into the variety of choices and considerations to guide you in making an informed decision tailored to your specific needs and aesthetic preferences.
Color and Texture Varieties
Flagstone offers a myriad of colors and textures to suit any design preference and landscape. From warm earth tones to cool blues and greys, the spectrum of color options enables you to create a truly personalized outdoor space. Textural variations, whether smooth or rugged, further enhance the stone's visual appeal, allowing for diverse and dynamic design possibilities.
Sizing and Thickness Considerations
The size and thickness of your flagstone play a pivotal role in the overall stability and appearance of your walkway or patio. Larger, thicker stones offer increased durability, making them ideal for high-traffic areas, while smaller, thinner options may be more suitable for intricate designs and patterns. Balancing these considerations is key to crafting a space that is both functional and visually striking.
Choosing the right flagstone involves a thoughtful exploration of color, texture, size, and thickness options. By carefully weighing these factors, you can ensure the creation of a walkway or patio that is not only beautiful but also stands the test of time. This foundation of knowledge empowers you to navigate the variety of choices available, resulting in a uniquely tailored and enchanting outdoor space.
Tools and Materials Needed
Equipping yourself with the right tools and materials is essential for successfully laying flagstone for your walkways and patios. This section will guide you through the necessities, ensuring you are well-prepared for the task ahead, ultimately leading to a smoother installation process and a more refined finish to your outdoor spaces.
Essential Tools for Laying Flagstone
To lay flagstone effectively, a range of specific tools are required. A stone hammer and chisels are crucial for shaping the stones to fit together perfectly. Additionally, a level ensures that your walkway or patio maintains an even surface, while a rubber mallet helps in setting the stones firmly into place. Having the correct tools on hand will facilitate a more efficient and precise installation.
Material Checklist
Beyond tools, several materials are crucial to the flagstone laying process. High-quality flagstones, of course, are the primary material. Moreover, you’ll need a suitable base material such as gravel or sand, and a bonding agent like mortar if you’re opting for a mortared surface. These materials, combined with the right tools, set the foundation for a well-constructed flagstone walkway or patio.
Being well-prepared with the necessary tools and materials is fundamental to the success of laying flagstone. The proper equipment and quality materials will not only make the process more manageable but also contribute to the longevity and aesthetic appeal of your walkway or patio. By ensuring you have everything needed, you’re well on your way to creating a beautiful and enduring addition to your outdoor living space.

Preparing the Ground
The foundational step in crafting impeccable flagstone walkways and patios is ground preparation. This section dives into assessing and marking the area, followed by leveling and compacting the ground, ensuring a solid and even base that will significantly contribute to the durability and stability of the structure.
Assessing and Marking the Area
Before diving into the hands-on work, it’s pivotal to assess and mark the area where the flagstone will be laid. Start by determining the shape and dimensions of your walkway or patio. Utilize marking paint or stakes and string to outline the area, considering any curves or corners, and ensuring it complements the surrounding landscape.
Ground Leveling and Compacting
Once the area is marked, the next step is ground leveling and compacting. Remove any grass, plants, or debris from the outlined area and dig to the desired depth, considering the thickness of your flagstones and the base material. Use a hand tamper or plate compactor to compress the soil, creating a firm, even surface. This step is crucial to prevent any future settling or shifting of the stones.
In conclusion, meticulous ground preparation is the cornerstone of a successful flagstone project. By accurately assessing, marking, and leveling the area, you lay the groundwork for a stable and long-lasting walkway or patio. This initial investment of time and effort in preparation will pay dividends in the form of a beautiful and durable addition to your outdoor space.
Laying the Flagstone
When it comes to laying the flagstone, a blend of precision and artistic vision is paramount. This section will guide you through arranging the flagstones for optimal aesthetic appeal and securing them for stability, ensuring your walkway or patio is not only visually captivating but also enduringly stable.
Arranging Flagstones for Aesthetic Appeal
The arrangement of the flagstones can significantly impact the overall aesthetic of your walkway or patio. Play around with the sizes, shapes, and colors of the stones, placing them in a way that creates a harmonious and visually pleasing pattern. Consider the natural variations in the flagstones and how they can contribute to a unique and organic look. It's this careful attention to detail that transforms an ordinary outdoor space into a stunning masterpiece.
Securing Flagstones for Stability
Once satisfied with the arrangement, the next crucial step is securing the flagstones. Stability is key to ensuring the longevity of your walkway or patio. Lay each stone on a bed of sand or gravel, adjusting the depth to achieve a level surface. Fill the gaps between the stones with sand, gravel, or jointing compound, which not only stabilizes the flagstones but also adds to the finished look.
In the final phase of laying the flagstone, aesthetics and stability go hand in hand. By thoughtfully arranging each piece and securing it in place, you craft a visually enchanting and durable walkway or patio that stands the test of time. This blend of artistic arrangement and structural integrity brings your dream outdoor space to life, ready for you to enjoy and showcase
Filling the Gaps
Filling the gaps between the flagstones is a critical step in ensuring the longevity and stability of your walkway or patio. In this section, we’ll delve into selecting the most suitable filling materials and mastering the technique to distribute them evenly, which will secure the flagstones and enhance the overall aesthetic of your outdoor space.
Selecting Appropriate Filling Materials
Choosing the right filling material is essential, as it plays a pivotal role in both the appearance and functionality of your flagstone project. Options include sand, gravel, and jointing compounds, each offering a unique look and level of stability. When selecting a filling material, consider the climate, the level of foot traffic, and the desired maintenance level, ensuring it complements the overall design of your outdoor space.
Technique for Filling Gaps Evenly
Applying the filling material evenly is just as important as choosing the right one. Start by sweeping the material into the gaps, making sure it is well-distributed and compacted. Be meticulous in filling each gap to avoid unevenness and instability. Regularly check the level of the filling material and add more if needed, ensuring that it’s flush with the flagstone surface to achieve a seamless finish.
Crafting a flagstone walkway or patio that is both beautiful and enduring involves meticulous attention to filling the gaps. By selecting the appropriate filling materials and applying them evenly, you lay the foundation for a stunning and sturdy outdoor space that will be a joy to use and a visual feast for years to come.
Sealing and Finishing
One of the final yet pivotal steps in crafting your flagstone walkway or patio is sealing and finishing. This stage is vital in protecting your flagstone against the elements and wear, thereby prolonging its beauty and durability. Dive into the benefits of sealing flagstone and explore how to choose the right sealant to ensure that your outdoor space remains a timeless and appealing sanctuary.
Benefits of Sealing Flagstone
Sealing flagstone offers numerous benefits that contribute to the longevity and aesthetics of your walkway or patio. It acts as a protective barrier against stains, weather damage, and erosion, thereby maintaining the vibrant colors and textures of the flagstone. Additionally, a well-sealed flagstone surface is easier to clean and requires less maintenance, allowing you more time to enjoy your outdoor haven.
Selecting the Right Sealant
Choosing the appropriate sealant is essential to maximize the benefits of sealing. Various sealants are available in the market, each designed for specific types of flagstone and environmental conditions. Consider factors such as the stone’s porosity, the climate of your location, and the desired finish – matte or glossy. Researching and selecting a sealant that aligns with your flagstone type and personal preferences will ensure optimal protection and enhance the visual appeal of your walkway or patio.
Sealing and finishing your flagstone walkway or patio are instrumental in preserving its charm and functionality. By understanding the advantages of sealing and meticulously choosing the right sealant, you create a resilient and enchanting outdoor space that stands the test of time, allowing you to relish the beauty and utility of your flagstone creation.
Maintaining Flagstone Walkways and Patios
Creating your dream flagstone walkway or patio is just the beginning—maintaining its beauty and structural integrity is equally important. Delving into the essentials of flagstone care, this section brings you routine cleaning tips and advice on addressing wear and tear, ensuring your outdoor space remains a picturesque and inviting retreat throughout the years.
Routine Cleaning Tips
Regular cleaning is fundamental to preserving the aesthetics and health of your flagstone walkway or patio. Gentle methods such as sweeping and hosing down the area can effectively remove dirt and debris. For more thorough cleaning, a mixture of mild detergent and water can be used, avoiding harsh chemicals that could damage the stone. It’s essential to rinse thoroughly and allow the area to dry completely, safeguarding the natural beauty of your flagstone.
Addressing Wear and Tear
Over time, flagstone can exhibit signs of wear and tear, such as chipping, flaking, or discoloration. Addressing these issues promptly will prolong the life of your walkway or patio. Small cracks and chips can often be repaired with a matching mortar or sealant. For more significant damages, replacing the affected stone might be necessary. Staying vigilant and acting quickly on signs of wear ensures the continued charm and safety of your flagstone feature.
The longevity and allure of your flagstone walkway or patio hinge on diligent maintenance. By adopting regular cleaning practices and promptly addressing signs of wear and tear, you can ensure your outdoor area remains an enchanting and welcoming space for years to come. These efforts will contribute to the enduring appeal and functionality of your expertly laid flagstone project, providing an ideal setting for relaxation and enjoyment.
Troubleshooting Common Issues
Even the most meticulously laid flagstone walkways and patios can encounter issues over time. Whether it’s uneven stones or damaged flagstones, addressing these problems promptly ensures the longevity and beauty of your outdoor space. This section provides insights into identifying and resolving common flagstone issues, keeping your patio or walkway in top-notch condition.
Dealing with Uneven Stones
Uneven stones can pose a tripping hazard and detract from the aesthetic appeal of your flagstone walkway or patio. It’s essential to identify the root cause, which may range from ground movement to improper installation. Once identified, lifting the uneven stone, adding or removing the base material, and repositioning the stone can often resolve the issue, restoring both safety and visual harmony to your outdoor area.
Repairing Cracked or Broken Flagstones
Cracked or broken flagstones can occur due to various factors, including extreme weather conditions, pressure, or natural wear and tear. Small cracks might be repairable with a suitable sealant or mortar, maintaining the original stone’s integrity. For larger cracks or breaks, replacing the damaged flagstone with a new one is often the most effective solution. Immediate action in such instances preserves the overall structure and appearance of your flagstone feature.
Troubleshooting common issues is integral to maintaining an immaculate and secure flagstone walkway or patio. By effectively dealing with uneven stones and promptly repairing cracked or broken flagstones, homeowners can ensure the enduring charm and safety of their outdoor spaces. These proactive measures underline the importance of regular checks and timely interventions in preserving the visual and structural appeal of flagstone installations.
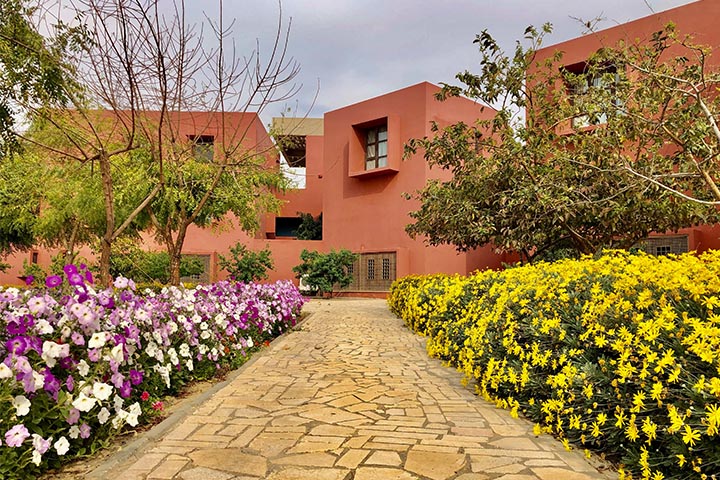
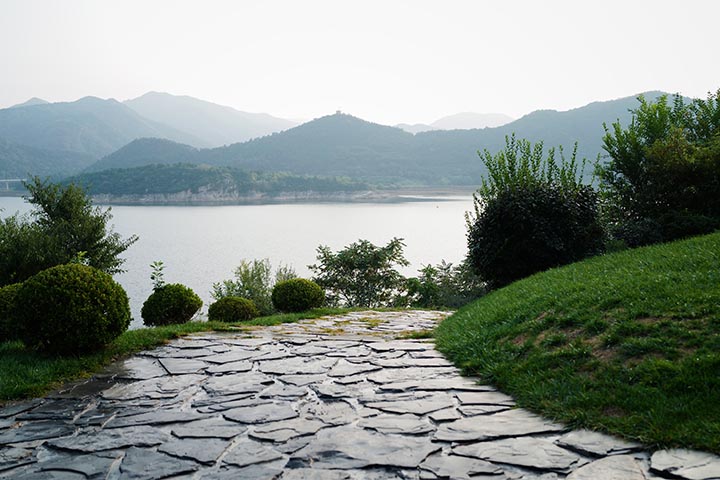
Inspiring Flagstone Design Ideas
Creating an inviting outdoor space goes beyond just laying flagstones; it's about designing a place that reflects your style and integrates seamlessly with your landscape. This section delves into innovative design ideas for flagstone walkways and patios, offering inspiration for creating unique patterns and harmoniously integrating your flagstone features with the existing landscape design for a cohesive and captivating outdoor area.
Creating Unique Patterns
Flagstone offers a versatile canvas for homeowners looking to experiment with unique patterns. By playing with different stone shapes, sizes, and colors, you can craft visually striking designs that make your walkway or patio stand out. From intricate geometric layouts to more relaxed, organic arrangements, the possibilities are endless for those seeking to add a personal touch to their outdoor spaces.
Integrating with Landscape Design
Flagstone walkways and patios should not be standalone features but rather integral elements of your overall landscape design. Consider the surrounding plant life, architectural elements, and other outdoor features when planning your flagstone layout. This integration creates a harmonious and visually appealing environment, where each component complements the others, enhancing the beauty and functionality of your outdoor living space.
Embracing inspiring design ideas is essential for anyone looking to elevate the aesthetic appeal of their flagstone walkways and patios. By creating unique patterns and effectively integrating flagstone with the surrounding landscape, homeowners can achieve a cohesive and enchanting outdoor space that is both inviting and reflective of their personal style.
Wrapping Up the Stone Path
Recapitulating key techniques, we’ve traversed the meticulous journey of laying flagstone walkways and patios, ensuring each step is detailed to guide enthusiasts and novices alike. From choosing the right flagstone to addressing common issues, the comprehensive insights provided aim to empower homeowners to embark on personalized flagstone projects. The versatility of flagstone allows for a plethora of unique designs, integrating seamlessly with various landscape styles, fostering creativity in outdoor spaces. Armed with expert laying techniques, homeowners are well-equipped to transform their exteriors into picturesque landscapes.
Encouraging personalized flagstone projects, this guide serves as a stepping stone for those eager to enhance their outdoor living spaces. The intertwining of aesthetics and functionality, realized through expert techniques, results in flagstone installations that are not only visually appealing but also enduring. The amalgamation of inspiring designs with practical insights paves the way for distinctive and harmonious outdoor environments. Ultimately, the journey of crafting your dream flagstone walkway or patio is filled with opportunities for exploration, innovation, and enjoyment.