You don’t need acres to feel alone—you need a plan that works fast. Crowded lots, second-story windows, and lively neighbors can turn a great yard into a fishbowl. A smart combo of screening structures, instant-impact plants, and deliberate layout restores calm quickly, without turning your home into a fortified compound.
On top of a quick home upgrade, here’s a surprising bonus: the right living barrier also softens noise. According to the USDA Forest Service guidance, a 100-foot-wide vegetative buffer can reduce sound by 5–8 dB—roughly the difference between “busy” and “comfortable.” That doesn’t mean you need a 100-foot hedge to get relief; it means a layered approach with plants plus targeted structures buys you noticeable peace while your greenery grows.
Start with Sightlines: Where Is Privacy Actually Breaking?
Before you buy a single panel or plant, identify the exact lines of sight that feel intrusive. Stand where you sit—at the dining table, in the spa, on the lounge chair—and mark the vertical slice of space that’s the real problem. Often, one upstairs bedroom window or a gap between two trees is doing 90% of the damage.
Take note of height (eye-level, second-story), distance (near fence vs. across the alley), and angle (straight on vs. oblique). That little audit tells you whether you need height fast, density fast, or a targeted angle change. With the trouble spots mapped, you can pick a fix that works today and matures into something beautiful tomorrow.
According to American Fence Company, once the view lines are clear, the fastest visible win usually comes from something you can install in an hour: prefabricated screens.
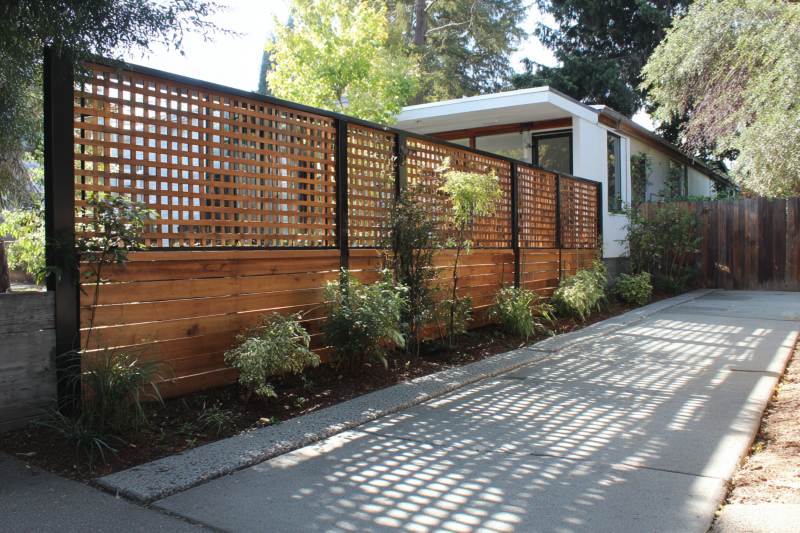
Prefab Screens & Panels: Instant Privacy with Zero Guesswork
Prefabricated privacy screens and modular fence panels offer immediate coverage, clean lines, and predictable results. They shine where you need a quick vertical plane and a tidy aesthetic—terraces, patios, and narrow side yards.
Why they work quickly
- Immediate opacity: Slat spacing, louvers, or laser-cut patterns block or blur views on day one.
- Adjustable height: Stackable or mountable on existing fences to hit the sightline precisely.
- Angle control: Louvers tilt to catch the worst angles without blacking out your whole yard.
- Maintenance-light: Composite and powder-coated metal shrug off weather and sprinkler overspray.
Install a short run where the line of sight is hottest rather than enclosing the entire yard. A few feet of well-placed screen changes the feeling of the whole space.
With the hardest view blocked, add life and softness so the fix looks designed, not defensive—that’s where living screens shine.
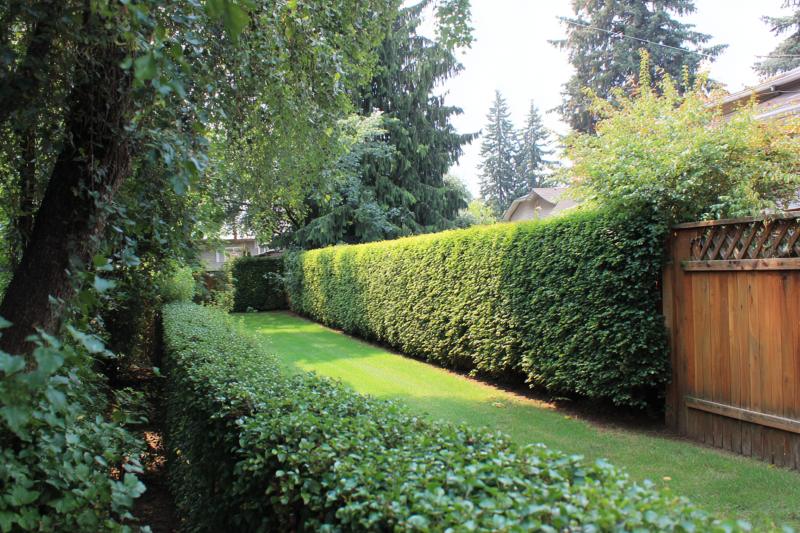
Instant-Impact Hedges: Green Walls That Perform This Season
Living Eco-friendly fencing fencing earns you texture, shade, and sound absorption. If you need results this season, think “big, bold, and evergreen.” Container-grown shrubs in the 5–7-gallon range create a noticeable wall immediately, and they thicken quickly with the right spacing and irrigation.
Fast performers by climate (examples)
- Mild/warm: Podocarpus, Japanese blueberry, Carolina cherry laurel
- Cold-tolerant: Green Giant arborvitae, American holly, boxwood mixes
- Dry/heat: Hopseed bush, Texas privet, ‘Little Ollie’ dwarf olive
- Coastal/salt: Pittosporum tobira, wax myrtle
Spacing matters more than the tag
For density now, tuck plants a bit tighter than mature spacing—then commit to regular shearing so the hedge knits. Drip irrigation on a timer keeps foliage clean and growth consistent.
Even the best hedge takes time to hit full opacity. While it grows, a trellis with climbers can fill the vertical gap gracefully.
Trellises & Climbers: Vertical Green Without the Bulk
A trellis is the minimalist’s privacy wall: a few inches deep, visually light, and fast to cover when paired with the right vine. Mount to walls, set as freestanding screens, or attach to the top of an existing fence to pull the eye up.
Winning pairings
- Wire or cable trellis + star jasmine: Evergreen, fragrant, and disciplined.
- Open-louver panel + Boston ivy: Explosive coverage, stunning fall color (deciduous).
- Metal grid + passionflower: Pollinator magnet with dramatic blooms (needs sun).
- Slim wood frame + evergreen clematis: Delicate look, dense coverage.
Set trellises a few inches off the wall for airflow and plant health. Train early, prune gently but often, and you’ll go from sparse to screen in a single season.
Now you’ve got structure and softness. To make this last—and protect your investment—choose materials that match your climate and maintenance appetite.
Materials That Age Well: Wood, Metal, and Composites
The perfect material is the one you’ll still love—and maintain—a year from now. Each has a personality and a to-do list.
Wood (cedar, cypress, redwood)
Warm, familiar, easy to cut in the field. Needs sealing or stain, especially near irrigation. Expect graying; embrace it or refresh annually.
Metal (aluminum, steel)
Strong, slender, highly modern. Powder coat resists rust; watch for corrosion at cuts. Great for slim profiles and patterned screens.
Composite/PVC
Low-maintenance, colorfast, heavier look at close range. Excellent where sprinklers or pool splash would beat up wood.
Mixing is fair game: wood posts with metal panels, metal posts with wood slats. Keep hardware finishes consistent so the mix reads intentional.
Once materials are set, the layout—where you place the screen or hedge—decides how big your small yard feels.
Layout Tricks That Make Yards Feel Bigger
Privacy can make a small yard feel cramped if you build one solid wall. Instead, stagger layers so the eye travels, and force perspective with converging lines.
Smart layout moves
- Offset screens: Place short runs in a zigzag to create depth pockets.
- Frame, don’t seal: Leave purposeful openings to views you like (a skyline, a tree).
- Borrowed landscape: Align a screen to block your neighbor’s window but let your gaze slide to the distance.
- Diagonal paths: Pull the eye across the yard; you’ll perceive more space than a straight shot.
In tiny side yards, treat privacy like a gallery: alternating screen panels and trellis sections feel intentional and airy.
With the big moves placed, let’s dial in heights so you capture privacy without running afoul of rules—or good neighbor vibes.
Height, Setbacks, and Being a Good Neighbor
Most neighborhoods have height limits for fences and setbacks for structures near property lines. Even when you’re within the rules, sharing your plan with neighbors keeps the peace. Offer a quick sketch and the reason you’re placing a panel here rather than there; people support problems they understand.
Where height limits cap you at the property line, pull the screen inside your yard a few feet and go taller. A freestanding trellis or evergreen row set off the boundary can exceed fence limits in many jurisdictions while still doing the job.
Once the basics are legal and friendly, you can focus on speed—what buys privacy this weekend versus what matures over the season.
Speed Stacking: Layer for Now, Plant for Later
The fastest formula is simple: prefab screen for instant coverage + trellis with a fast vine for 60–90 days + evergreen hedge for the long haul. You’re never stuck in “waiting mode” because each layer has a job at a different time scale.
A simple weekend stack
- Install a 6–8' louvered panel exactly on the sightline.
- Set a narrow trellis just behind it; plant two vines to train upward.
- Add a staggered row of evergreen shrubs 18–24" behind the trellis.
- Mulch and drip once; adjust emitters as the hedge thickens.
Wrap-up: Layering handles views. To tame chatter and traffic, combine green with solid surfaces that bounce sound the right way.
Quiet, Please: Pair Green with Solid Barriers
Plants soften sound, but solid mass deflects it. A low earthen berm, a masonry seat wall, or a heavy, tight-slatted panel placed close to the source (street or AC unit) knocks down the harshness. Then, a hedge behind that wall absorbs the leftovers, so you don’t create an echo chamber.
Spot-treat mechanical noise with sound blankets or decorative enclosures; aim for airflow and service access. Your yard will feel calmer, and your screens will look like they belong.
Wrap-up: The structure is set. Now let’s match the plant palette to the microclimates in your yard so everything thrives with minimal fuss.
Right Plant, Right Microclimate
Every yard has hot walls, shady corners, windy gaps, and wet spots. Put the rugged heroes where conditions are toughest and save your divas for kinder corners.
Microclimate matches
- South/west hot walls: Silver or narrow-leaf evergreens, heat-tolerant vines.
- Wind tunnels: Dense, flexible hedges (grasses in front to slow gusts).
- Deep shade: Evergreen camellias, aucuba; use lattice rather than tight slats.
- Irrigation overspray zones: Metal or composite panels; plants with waxy leaves.
A plant that’s happy grows dense—density is privacy. You’ll work less and enjoy more.
Wrap-up: Speaking of work, let’s keep maintenance realistic so your privacy stays polished.
Maintenance That Keeps Privacy Looking New
Screens need a rinse; hedges need a trim. Put both on a rhythm and you’ll never face a weekend of overwhelm.
- Quarterly: Hose dust off panels, wipe hardware, check post bases.
- Monthly (growing season): Light shear to encourage branching; adjust ties on climbers.
- Seasonal: Refresh mulch, top-dress with compost, inspect irrigation.
Use hedging cuts that slope inward slightly so light reaches the base; that prevents bare ankles on your green walls.
Wrap-up: With care scheduled, pick a budget path that gets you 80% of the benefit right away.
Budget Paths: Good / Better / Best
Good (under $400, DIY-friendly)
- Two modular screens for the hottest sightline
- One trellis + two starter vines
- Four 5-gallon shrubs + drip line kit
Better ($400–$1,200, biggest visual leap)
- Longer run of mixed louver + patterned panels
- Six to eight 5–7-gallon shrubs (tighter spacing)
- Low-voltage up/down lights to “finish” the wall
Best ($1,200+, polished & long-term)
- Custom posts + composite or metal infills
- 8–10 shrubs for immediate hedge face
- Seat wall or berm near noise source
Pick the tier that matches your time and tools; you can always upgrade components later without starting over.
Wrap-up: Budgets are sorted. Before you hit “buy,” avoid the common missteps that make projects look rushed.
Common Mistakes (and Easy Fixes)
- One long wall: Break it up; offset panels feel intentional and help airflow.
- Tight plant spacing with no plan: Tight is fine—just commit to shearing for a knit.
- Random metal finishes: Choose one (black, bronze, stainless) and repeat.
- Ignoring the base: Mulch and mow strip keep everything crisp and easy to maintain.
- No lighting: A couple of warm uplights turn a screen into architecture.
Attitude check: If it looks like a utility fix at noon, add light and a planter; it will read like design by dusk.
Wrap-up: Finally, a few expert tips can shave hours off your install and years off your learning curve.
Pro Notes: What Installers Wish Homeowners Knew
“Privacy happens at angles, not just in straight lines. If you rotate a panel 15 degrees, you can block two windows at once and keep airflow.” — Lena Park, PLA, landscape architect
“Train vines early and often. Gentle guidance weekly beats one aggressive prune in August—and you’ll keep the coverage you worked so hard to grow.” — Miguel Santos, ISA Certified Arborist
Pro tip for panels: Shim posts perfectly plumb before you set concrete. A 1° lean is visible from the street and makes any slat pattern look off.
Wrap-up: Armed with pro wisdom, you’re ready to place the final pieces that elevate privacy into style.
Style It Like It’s Meant to Be There
Privacy fails when it looks like an afterthought. Repeat one material, one accent color, and one plant form at least three times. That rhythm fools the eye into thinking the screen was part of the original architecture.
Small décor cues help: a bench tucked into a screen’s return, a narrow herb trough against the trellis, or a single oversized planter at the end of a hedge. The space suddenly feels complete, not patched.
Wrap-up: You’ve built calm; now seal it with a few finishing touches that reward daily use.
Final Touches That Make Privacy Feel Luxurious
Add a warm path light or two, a coir doormat that actually fits your door width, and a hose reel that doesn’t dangle like spaghetti. Consider a tiny water feature for sound masking; even a tabletop bowl with a recirculating pump makes conversation easier.
If you love entertaining, anchor a café table or chaise in the newly private zone. When a space looks like it’s meant for people, people use it—and that’s the whole point.
Wrap-up: You’ve reached the fun part: enjoying what you’ve made. Let’s tie it together with a quick recap and a nudge to get started.
Privacy That Starts This Weekend
Gaining privacy fast is about precision, not bulk. Identify the true sightlines, drop a screen exactly where it counts, and back it with a trellis and a compact hedge that thickens over time. Suddenly, your yard feels like a retreat rather than a corridor—and it happened without walling yourself off from daylight or breeze.
Once the big move is in, everything else is polish: a consistent material palette, repeatable plant rhythms, and small maintenance habits that keep the whole edge crisp. The result is quiet, shade, and space that feels composed from the curb and comfortable from the chaise. If a single weekend can change how your yard feels to live in, what’s the one stretch of fence or hedge you’ll transform first?